|
| |
Aide de Camp
2 Hints and Tips
PLANNING AND PREPARATION
By Nicholas Bell
This text assumes that you
have thoroughly read the manual and have spent some time with Aide de Camp II
experimenting with at least the gamesets included on the CD. I have
digressed to using terms more familiar to my wargaming vocabulary. I
prefer to use "unit symbol" instead of "piece symbol" and
"terrain symbol" instead of "Map/Board Symbol" which the
ADC2 manual uses. The following comments are more for the typical
hex-based board wargame conversion process.
 |
 | First, create a new folder in your ADC2/Gamesets folder.
Name the folder the name of the game you're going to make a set
for and follow it by the current date.
| The purpose of putting the date on the end of the folder
is to make backing up the your work easier. After every
session, compress the entire folder using the name of the folder
as the zipped file name. Before you start work in your next
session, rename the folder with the new current date.
| By doing this you will create an archive of your work
which you can go back to if a problem arises. Save these
archives for 4-6 sessions before deleting them.
| In addition to backing up your
gameset, it is absolutely
essential that you save your map work, symbol creation, and game
*.ops file frequently - every few minutes. You never know
when Win2000 / XP / VISTA / 7 / 8 is going to decide to stop working properly, or when
you might inadvertently make a serious error. |
| | |
|
|
The next step is to decide on the map and unit symbol
sizes. Never just start making a set without first making a few unit
symbols and putting them on a blank map to see if they really look like you
want them to. While the Symbol Editor does allow for changing the size
of terrain and unit symbols after the fact, it is limited in its flexibility
and the results will never by as nice as making the symbol the correct size
from scratch.
|
The size of the symbols at each zoom level is
critical to how the gameset will look and play. Most set creators
follow this basic guideline for size symbols at each zoom level:
|
|
Zoom 1
should
show the entire mapboard if possible and is used for getting an
overall view of the game situation and to assist players in zooming in
and out (which is often easier than scrolling). Terrain symbols
may be simplified to make map more clear and locating the units
easier. Because of the small size of the units (necessary
because the small map terrain symbols), they do not display a lot of
information. Sometimes just the nationality by color, flag, or
emblem (e.g. German Balkan Cross, Russian Red Star) and/or the unit
type (using the typical 'NATO' symbols as icons will be too small).
Remember, the game is not intended to be played at zoom 1 - its use is
for gathering information on the game situation as a whole.
|
Zoom 2
is used primarily for movement, with combat resolution possible, but
not mandatory. Players will be able to determine terrain and its
effects on their plans and unit movement. Dependent on unit
symbol sizes, numeric information on the unit pieces maybe present,
but unit type and function to should definitely be made accessible to
the player at a glance. If possible, size the map so that number
of hexes visible on the screen is twice as many across as the maximum
movement rate of fastest unit. For example, if the fastest unit
has a movement rate of 8, then try to make the map hex size small
enough to ensure that at least 16 hexes across are visible on the
screen. The greater the area of the map displayed, the easier the game
will play. Of course, this is dependent on the player's monitor
size and the resolution used. Those players with 19" and
21" monitors have a real advantage as they can see more of the
playing area if they set their resolution to 1024 x 768. (or even
higher - if they have good eyes!)
|
| Zoom 3
is used primarily for combat resolution as not enough of the map will
be visible for moving units in most cases. Unit symbols are
normally shown with all numeric factors, symbols, icons, or other
eye-pleasing embellishments. Again, those with larger monitors
may be able view more map, but just because you have a huge screen
doesn't mean everyone else does, so don't make your terrain and unit
symbols too large. |
|
While you are limited to increments of 5 pixels when
creating hex sizes, you have total flexibility regarding the size of the
unit symbols. There are a couple of things to consider here:
|
1. You want to make sure that the data you
wish to display on the unit is easily readable. However, if you
make the unit too large users will not be able to see the type of
terrain the unit is in. Furthermore, if you make the unit
symbols too large, they will overlap the hexsides and block out
portions of other units. Make your unit symbols 60-75%
the size of your terrain symbols for the best results.
Example: Terrain Symbol size is 40 x 40 pixels. Unit
symbol size should not exceed 30 x 30 pixels.
|
|
2. ADC2 allows for either 1 or 4 unit
pieces to be displayed. If you desire multiple units to be
displayed in a hex, you need to make the symbols considerably smaller
- usually less than 50% the size of the hex terrain symbol if
vertical. Horizontal grain may allow displaying multiple units at up
to 63%. You will have to experiment - vertical hex grain maps will
display multiple units differently than horizontal hex grain maps.
|
Multiple
Unit per Hex Displays
|
|
|
Vertical Hex Grain
|
 |
|
 |
| Terrain: 35 x
35 Unit: 19 x 16 |
|
Terrain: 45 x45
Unit: 19 x 21
|
|
Horizontal Hex Grain
|
 |
|
 |
| Terrain: 35 x 35 Unit:
21 x 21 |
|
Terrain: 55 x55 Unit:
35 x35 |
|
Unit symbols should normally be odd numbered pixels
in size, e.g. 27 x 27. This enables you to center
symbols and numbers. Careful examination of the majority of
even-number pixel sized unit symbols reveal symbols, icons and numbers which
are not perfectly aligned. This may be distracting to the discerning
eye
|
Decide on how you are going to orientate the
mapboard.
Is north toward the top of the display? Some game mapboards orient the
map to facilitate across the table play. Since this has no impact in
ADC2, you may want to consider orienting north at the top of the screen.
Just remember to duplicate the correct hex grain when you create you terrain
symbols. You cannot change the hex grain after creating symbols.
|
Decide whether you are going to use a hexgrid overlay
or if you are going to make the hexgrid an integral part of the terrain
symbols. A hexgrid overlay gives you much more flexibility. You
can turn the grid overlay on and off during game play. If you use a
hexgrid integral to the symbol, it's there all the time. However, an
hexgrid overlay displays on top of hexsides, which can interfere with the
appearance of rivers, borders and other types of hexside symbols. An
integral hexside is not visible under hexside symbols, resulting in an
appearance more similar to many actual game mapboards where no printed
hexside is visible along rivers.
|
Whenever possible, try and make use of the sets
available to avoid having to recreate a lot of symbols. Check out the
various terrain, symbol sizes, and hex grain of the many sets freely
available and see if they match your needs. Making coastline, road or
river hexes (transparent hex attributes, not hexlines/hexsides), and forests
with treelines look great but can be quite time consuming to make.
Borrow heavily whenever possible. (Be thoughtful too, and give the
original set creator credit where due).
|
| | |
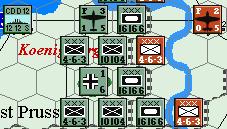
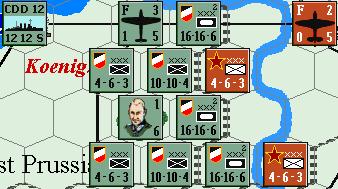
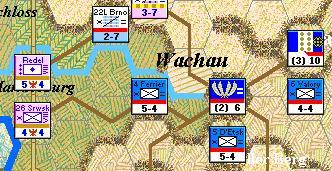
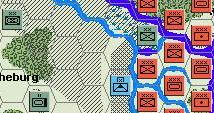
Examples of Symbol Sizes at
Zoom Levels 1-3
|
Clash of Arms War
Without Mercy
|
 |
Zoom 1 Terrain: 15 x
15 Units: 11 x 11 |
 |
Zoom 2 Terrain: 35 x
35 Units: 21 x 21 |
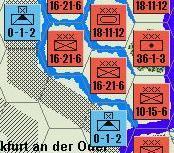 |
Zoom 3 Terrain: 55 x
55 Units: 37 x 37 |
 |
Zoom 1 Terrain: 25 x
25 Units: 17 x17 |
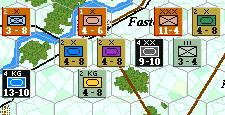 |
Zoom 2 Terrain: 40 x
40 Units: 29 x 29 |
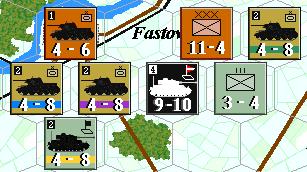 |
Zoom 3 Terrain: 70 x
70 Units: 53 x 53 |
|