Aide de Camp
2 Hints and Tips
USING SCANMAPS
By Nicholas Bell
Creating an ADC2 Module using a scanned map is an exciting way of creating
your mapboards. A scanned map has the advantages of looking exactly like the game
mapboard. On complex mapboards with many roads, coastlines, or other detailed terrain this
is a bonus because you do not have to reproduce these as individual terrain symbols. On
the other hand, the process of scanning and piecing together a scanmap is initially a
daunting task. Another disadvantage is the large size of the files which even a single map
game using a scanmap creates. This makes transferring the files to other users a
time-consuming process.
One word of caution - you need to be familiar with using a scanner and an image editor. If
you don't know about resizing images, resolutions, color depth, cutting and pasting images
it's time to hit the books now before you even think about continuing creating a
scanmap.
And be sure to read the instructions in the latest ADC2 Manual
available on this site for the basics of creating a scanmap. The following are Hints
and Tips which often reinforce what the manual says, but do not pretend to be a
detailed step by step explanation of the process.
I highly recommend using the Zoom 3 image as the base image for the scanmap. Using Zoom 1
means that the bitmap will be scaled up to make the Zoom 2 and 3 mapsheets. Scaling up
means the program will interpolate the pixels resulting in fuzziness at the higher zoom
levels. Another danger of starting with the bitmap as Zoom 1 is that the Zoom 3 bitmap
file size may be so large as to either be outside the parameters that the program can
handle, or may use up all of your computer system resources and crash the program. You may
also want to use the Windows Display Properties Setting to 256 colors while scanning to
reduce the file size if system resources become a problem. Just remember to switch back to
True Color before going back into ADC2.
As with all initial work when creating any new ADC2 gameset module, it's necessary to
experiment a bit. Scan some of the map at various resolutions and create test scanmaps to
check how they will look. Try and scan at 75 or 100 DPI to keep the file size small, but
make sure the text on the map is readable. Also remember that the size of the map at
various zoom levels is controlled by the size of the image you use as a base.
It is important to understand that it is difficult to impossible to create a scanmap and
use a hexgrid which will align exactly with the hexes on the mapboard image. So don't
bother. Instead, select a hex or square size which is small - the smaller the better. Do
not create a grid overlay symbol or put a hex outline on your terrain symbols. Without an
outline, the grid will remain invisible. By keeping the size of the hex or square small,
each hex, square, or area on the visible map will contain many small hexes or squares.
When you place pieces in the Playgame Module of ADC2, you will be able to place them in
numerous different invisible hexes/squares within the visible hex or square grid that is
part of the mapboard bitmap image. Playing a game and moving pieces in ADC2 using a
scanmap is then more like playing on an actual paper mapboard in that you have latitude
where within a hex, square or area you place your cardboard pieces. This enables you to
offset the pieces in ADC2 a little making seeing what is in a stack of units easier.
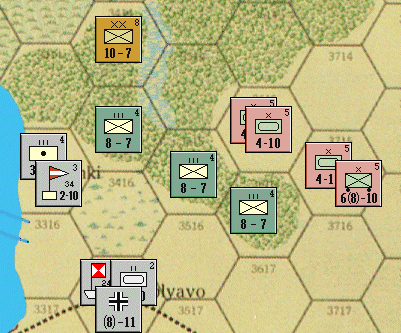
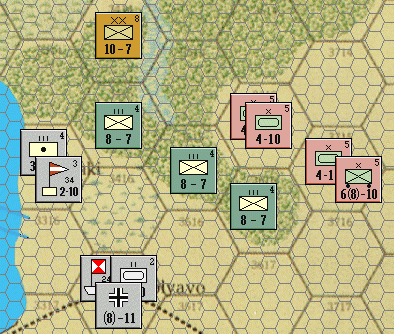
 |
 |
| What you see while playing |
The hexgrid has been given an outline to make
it visible |
Unless you have access to an enormous scanner, you will end up scanning
your map in pieces. Now you should know by now (after reading the ADC2 Manual) that there
are limitations to the size of the bitmaps that ADC2 can use. You may be thinking
"Well I might as well use each scanned piece of map and use the scanmap and mapeditor
program to piece them together." Well, not so fast now-you will run into problems if
you do this. The problem is the result of the scanning process, especially when you are
scanning many parts of the map, which inevitably results in some of the scans being
slightly out of alignment. What you need to do is piece the scans back together into a
full sized bitmap of the game mapboard using whatever paint program or image editor you
have. I recommend creating a very large new blank image and then pasting the various parts
of the map onto it. I have yet to see any "stitch" function in an image editor
work properly - at least for what I am attempting to accomplish. Using the image editor
you can rotate, shrink or enlarge the various parts of the map until you get good
"fit." Then use the "clone", "smudge" or whatever editor
function you like to eliminate the seams between the scanned parts (or any other
imperfections on the map).
Remember too that you use the various tracks and boxes from the boardgame on the
scanmap.
If they are on the boardgame map, you've already scanned them. Of course, if they are
upside down or at odd angles (not a problem when playing someone FTF across the table)
it's time to do some cutting, flipping and pasting. And don't forget those off-map cards
and charts - there may be an opportunity to scan and paste them on the map image. Expand
the size of the scanned image (ie add image area using the "enlarge canvas"
function, don't change resolution) to give you more room for these extra items.
Once you've got your map image cleaned up and ready to input into ADC2, you have consider
how you are going to deal with the maximum BMP file size limitations, which is limited to
4,176,000 pixels and 2730 pixels in either the X or Y axis. One option, as mentioned in
the manual, is to decrease the size of the BMP file by reducing the size of the overall
image. Image editors have tools which tell you exactly the size of the image in pixels and
allow you to reduce or enlarge the image to specific size. I was able to reduce the Zoom 3
image of my Pegasus Bridge gameset to a size of 2333 pixels by 1744 pixels, or 4,075,062
pixels. The game map is a standard 22" x 34" mapsheet, and the resolution and
clarity are fine. So for single map this may be a viable alternative.
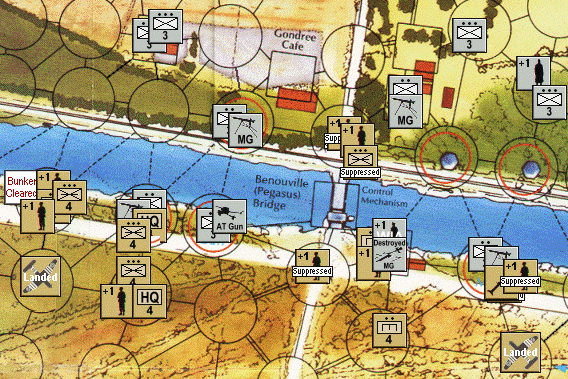
 |
A small portion of the Pegasus Bridge
Mapboard at Zoom 3 |
For larger maps, or maps which require greater resolution, you will have
to use the "Multiple Base Mapsheets" in the scanmap routine in the Mapboard
editor. To use this, first cut the whole mapboard bitmap file into separate smaller bitmap
files that the system can handle. Be sure to name the individual BMP files of your map
sections with names that indicate their position in the map as a whole. Make a rough
sketch of the map (normally a rectangle) and draw how you are cutting up the main image.
Indicate the name and the pixel dimensions in width and height on your sketch.
Make sure the box next to "Use Multiple Base Mapsheets" is checked when you run
the scanmap routine. When prompted to select a base mapsheet BMP file, select the bitmap
of the upper left hand corner of the map image you cut up (you did name these pieces to
help you keep track, right?) Use your rough sketch to help you visualize what you are
doing here, and to assist you in determining start locations for each additional bitmap
mapsheet you are adding to main mapsheet. Remember that unlike what you've been taught in
school, the x-y intersect point (coordinates 0,0) is in the upper left corner of the
display instead of the lower left corner. Thus positive x values increase towards the
right, as you would expect. However, positive y values go toward the bottom of the
display. Positive y values go down - not negative as you've been taught.
Don't ask me why, it's a programmer's thing.
Remember you can also change the position of the map sections in the Map Editor Module
using the Mapsheets | Adjust Base Maps option. This allows you to immediately see the
result of your adjustments. You could forget attempting to get the layout setup in the
scanmap routine if that is too difficult to visual and just do it all in the mapeditor
where you can instantly see the results of your work. You still have to select all the
pieces of the image that you cut up, but you can let them all start at the same point.
When you open up the map though, all the images will be overlapping one another in the
upper left corner. This can be a little confusing if you're not expecting it. You also
have to align all the mapsheet bitmaps in each zoom level - another reason to try and get
it set up when creating the scanmap.
Always keep handy backups of your scanmaps and the main image before you do anything. Read
the latest ADC2 manual for more detailed step by step instructions of the mechanics of
operating the scanmap routine. Be patient and willing to experiment. Once you've mastered
creating your first scanmap, it's no longer difficult.
And finally, a few tips from Charles McLellan who has mastered creating a beautiful, yet
difficult multi-piece scanmap:
1. Don't "Select Symbol Set" when you are trying to make a scanned map.
2. When it says "Select Bitmap File for Mapsheet", it doesn't mean select a
folder for the mapsheets, it means select the base bitmap file from which you intend to
make your mapsheet. If you select a folder, it makes a pretty small map.
3. The (0,0) coordinate is in the upper left, not lower left.
4. The "Y" coordinated goes down in a positive (+) direction, not up. (Wait till
my trig teacher hears all this.)
5. If some things are 10 pixels high and the "Y" coordinate starts at 0, the
next pixel starts at 11 not 10.

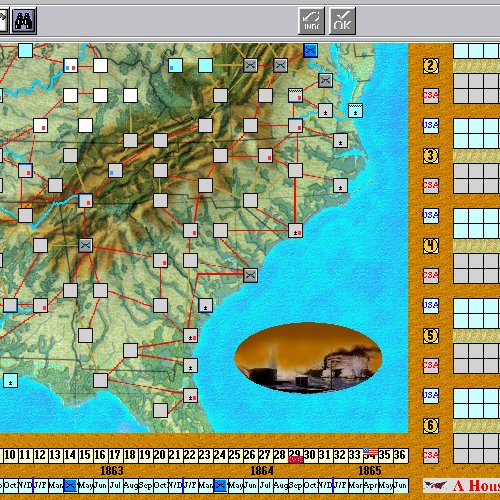
A part of Charles McLellan's scanmap for A House Divided
